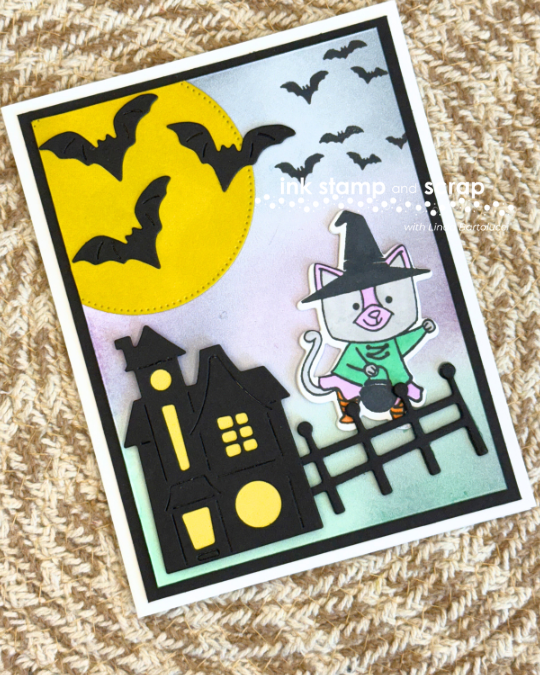
It's hard to believe as we're sweating out the last days of summer that Halloween is in stores and ready to craft in my Stampin' Up! Store. Today I'm sharing a fun new Halloween card that's easy to make and fun to give. If you want to see all the Halloween products available from Stampin' Up! right now – pop over to my Stampin' Up! Store and put the word HALLOWEEN in the search bar.
The Card
The Spooky Halloween Bundle comes with great stamp images, fun phrases and great dies. The die set is a mix of dies that cut out the stamped images and ones that make images on their own. The spooky house, bats and fence are featured in this card.

The Supplies
If you like this project – here are all the supplies used. Simply click on an image to shop in my Stampin' Up! Store.

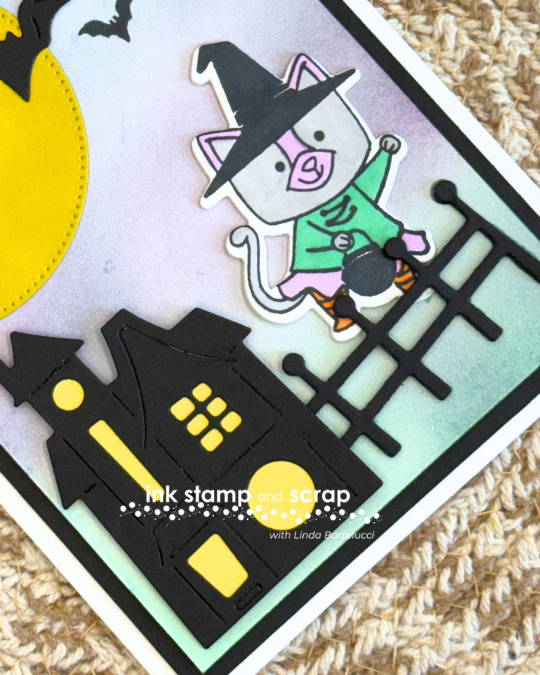
Above you'll find a close up of two different ways to give your die cut images dimension. For the house we used Black Stampin' Dimensionals. For the cat we die cut the image multiple times and glued them together to create a stacked image.
Below you'll find a quick way to stamp the inside of your card. Best part? These stamps are from the same bundle! I love one-stop shopping!

Let's Make It
This card uses a cool technique to make the background and then each element has it's own unique twist. For that reason I broke down the elements individually. Hope this helps –
Background on Basic White
- Use your blending brushes to add Shy Shamrock to the lower portion of the card.
- Continue to the middle using Fresh Freesia.
- Use the Shy Shamrock to cover the bottom portion of the Fresh Freesia creating a blended transition.
- At the top use Secret Sea.
- Use the Secret Sea to cover the very top portion of the Fresh Freesia creating a blended transition.
Moon and Bats
- Die cut the moon from Darling Duck card stock and then use a blending brush to add Darling Duck ink to the “moon”. Make sure you use more on the outside than the center.
- Die cut the double bat die twice to give you four bats.
- Place the moon in the upper left corner of the Basic White layer and trim the edges. Add three bats using glue making sure one is hanging off to the right of the moon.
- Stamp the bats in Tuxedo Black ink multiple times in the upper right corner of the Basic White layer.
Haunted House
- Die cut the haunted house from Basic Black card stock.
- Place a piece of Darling Duck cardstock behind the house and trim to make sure it only shows through the openings in the house die.
- Attach to card using Black Stampin' Dimensionals.
Spooky Cat
- Stamp the cat in Tuxedo Black ink on Basic White scrap card stock
- Color the cat with Stampin' Blends as shown on the card
- Die cut the colored cat and two more cats from the Basic White scrap card stock
- Glue all three in a stack together with the colored cat on the top
- Glue to the card as shown
Wrap It Up!
- Die cut the fence from Basic Black card stock
- Use minimal glue to add the fence as shown on the card
- Stamp Happy Halloween on the inside of the card
- Add the fourth die cut bat above the greeting
- Glue the Basic Black layer to the card base
- Glue the colored and assembled Basic White layer to the card
Dimensions and Measurements
- Basic White – 8 1/2″ x 5 1/2″
- Basic Black – 5 1/4″ x 4″ plus scrap for bats, fence and house
- Basic White – 5″ x 3 3/4″ plus scrap for stacked cats
- Darling Duckling – scrap for moon and house windows
Pin This
If you want to make sure you have an easy to find copy – be sure to save this to your Ink Stamp and Scrap Pinterest board. Let me know if you like this new picture with a pin for you to save.

Thanks for Stopping By
I really appreciate you reading all the way to the end of the blog post. It really helps my business a lot! Have you checked out the post about Using Your Scraps? xo, Linda

![Spooky Halloween Bundle (English) [ 166199 ] Spooky Halloween Bundle (English) [ 166199 ]](https://assets1.tamsnetwork.com/images/EC042017NF/166199s.jpg)
![Spooky Halloween Photopolymer Stamp Set (English) [ 166192 ] Spooky Halloween Photopolymer Stamp Set (English) [ 166192 ]](https://assets1.tamsnetwork.com/images/EC042017NF/166192s.jpg)
![Spooky Halloween Dies [ 166198 ] Spooky Halloween Dies [ 166198 ]](https://assets1.tamsnetwork.com/images/EC042017NF/166198s.jpg)
![Mini Stampin' Cut & Emboss Machine [ 150673 ] Mini Stampin' Cut & Emboss Machine [ 150673 ]](https://assets1.tamsnetwork.com/images/EC042017NF/150673s.jpg)


![Small Blending Brushes [ 160518 ] Small Blending Brushes [ 160518 ]](https://assets1.tamsnetwork.com/images/EC042017NF/160518s.jpg)
![Tuxedo Black Memento Ink Pad [ 132708 ] Tuxedo Black Memento Ink Pad [ 132708 ]](https://assets1.tamsnetwork.com/images/EC042017NF/132708s.jpg)
![Tuxedo Black Memento Ink Refill [ 133456 ] Tuxedo Black Memento Ink Refill [ 133456 ]](https://assets1.tamsnetwork.com/images/EC042017NF/133456s.jpg)
![Darling Duckling Classic Stampin' Ink Refill [ 165280 ] Darling Duckling Classic Stampin' Ink Refill [ 165280 ]](https://assets1.tamsnetwork.com/images/EC042017NF/165280s.jpg)
![Darling Duckling Classic Stampin' Pad [ 165277 ] Darling Duckling Classic Stampin' Pad [ 165277 ]](https://assets1.tamsnetwork.com/images/EC042017NF/165277s.jpg)
![Smoky Slate Stampin' Blends Combo Pack [ 154904 ] Smoky Slate Stampin' Blends Combo Pack [ 154904 ]](https://assets1.tamsnetwork.com/images/EC042017NF/154904s.jpg)
![Fresh Freesia Classic Stampin' Pad [ 155611 ] Fresh Freesia Classic Stampin' Pad [ 155611 ]](https://assets1.tamsnetwork.com/images/EC042017NF/155611s.jpg)
![Fresh Freesia Stampin' Blends Combo Pack [ 155518 ] Fresh Freesia Stampin' Blends Combo Pack [ 155518 ]](https://assets1.tamsnetwork.com/images/EC042017NF/155518s.jpg)
![Fresh Freesia Classic Stampin' Ink Refill [ 155612 ] Fresh Freesia Classic Stampin' Ink Refill [ 155612 ]](https://assets1.tamsnetwork.com/images/EC042017NF/155612s.jpg)
![Shy Shamrock Classic Stampin Pad [ 163808 ] Shy Shamrock Classic Stampin Pad [ 163808 ]](https://assets1.tamsnetwork.com/images/EC042017NF/163808s.jpg)
![Shy Shamrock Stampin’ Blends Combo Pack [ 163825 ] Shy Shamrock Stampin’ Blends Combo Pack [ 163825 ]](https://assets1.tamsnetwork.com/images/EC042017NF/163825s.jpg)
![Shy Shamrock Classic Stampin’ Ink Refill [ 163817 ] Shy Shamrock Classic Stampin’ Ink Refill [ 163817 ]](https://assets1.tamsnetwork.com/images/EC042017NF/163817s.jpg)
![Black Stampin' Dimensionals Combo Pack [ 150893 ] Black Stampin' Dimensionals Combo Pack [ 150893 ]](https://assets1.tamsnetwork.com/images/EC042017NF/150893s.jpg)
![Secret Sea Classic Stampin' Ink Refill [ 165281 ] Secret Sea Classic Stampin' Ink Refill [ 165281 ]](https://assets1.tamsnetwork.com/images/EC042017NF/165281s.jpg)
![Secret Sea Classic Stampin' Pad [ 165285 ] Secret Sea Classic Stampin' Pad [ 165285 ]](https://assets1.tamsnetwork.com/images/EC042017NF/165285s.jpg)
![Bone Folder [ 102300 ] Bone Folder [ 102300 ]](https://assets1.tamsnetwork.com/images/EC042017NF/102300s.jpg)
![Paper Trimmer [ 152392 ] Paper Trimmer [ 152392 ]](https://assets1.tamsnetwork.com/images/EC042017NF/152392s.jpg)
Leave A Comment