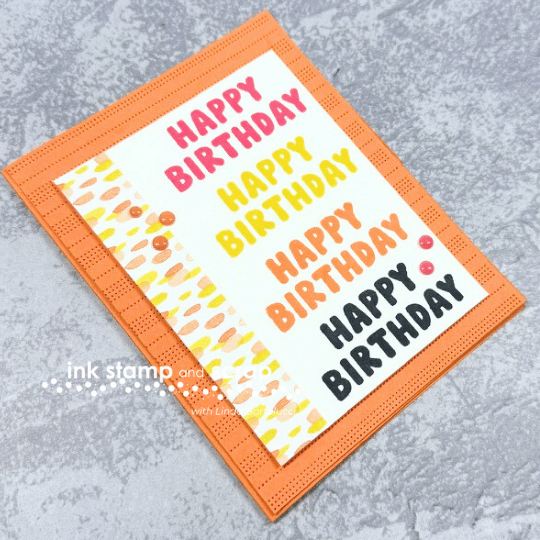
This cheerful birthday card is all about the Repeated Greeting Quick Tip—it’s one of my favorite tricks when I need a card in a hurry! Repeating a simple sentiment is a fun way to fill the space without overthinking it. I also added a little scrap of patterned paper next to the greetings and used a background die to bring in some texture and interest. In this post, I’ll walk you through how to make the card, plus share a bunch of quick tips you can use on all kinds of projects.
The Card
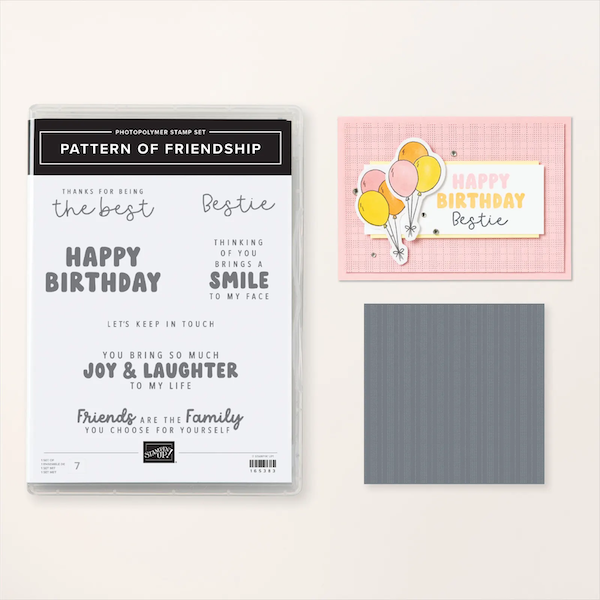
Here's a picture of the card we're making and the stamp set used to create the images. It's perfect when one stamp set and bundle of dies come together to make a great card.

The Supplies
If you like this project – here are all the supplies used. Simply click on an image to shop in my Stampin' Up! Store.
Quick Tips
- To make this repeated greeting I started with a piece of card stock the correct width, but longer than I would need to stamp the four colors. After I stamped all of them, I cut the bottom of the card stock and measured it. This became the length dimension for my patterned paper.
- Add an odd number of embellishments when you're not doing too many. Your brain likes that more.
- If you're going to add texture to a card with a bold fonted stamps and bright colors – use a small pattern not a big bold textured die
Let's Make It
Now let's make this happy birthday card. If you're a crafter that likes to copy exactly down to the 1/8″ I've included the dimensions below as well.
- Fold and burnish the score line for the Timid Tiger card base
- Stamp the four greetings on the Basic White layer
- Cut the Basic White layer under the last “happy birthday”
- Match the length of the Basic White layer to the patterned paper
- Add patterned paper to the side of the Basic White layer making the total width measure
- Add two groups of flat pearls along the stamped and paper layer
- Die emboss the Timid Tiger layer and add to the card base
- Use Stampin' Dimensionals to add the greeting and pattern paper layer to the card
option: add a Basic White layer inside the card to write your message
Dimensions and Measurements
- Timid Tiger – 8 1/2″ x 5 1/2″
- Timid Tiger – 4 1/8″ x 5 3/8″
- DSP Scrap – 3/4″ x 4 3/4″
- Basic White – 3 1/2″ x 4 3/4″
- Basic White (optional) – 4″ x 5 1/4″
Your Turn
I had such a good time making this card – it puts me in such a good mood to use cheerful colors! If you try any of the tips from this post or you copy the card – be sure to let me know in the comments or in our Facebook group. I love to see what you're creating!
Thanks for Stopping By
I really appreciate you reading all the way to the end of the blog post. It really helps my business a lot! Have you checked out the post about using the Twist Card Layout? xo, Linda

![Pattern Of Friendship Bundle (English) [ 165385 ] Pattern Of Friendship Bundle (English) [ 165385 ]](https://assets1.tamsnetwork.com/images/EC042017NF/165385s.jpg)
![Pattern Of Friendship Die [ 165384 ] Pattern Of Friendship Die [ 165384 ]](https://assets1.tamsnetwork.com/images/EC042017NF/165384s.jpg)
![Pattern Of Friendship Photopolymer Stamp Set (English) [ 165383 ] Pattern Of Friendship Photopolymer Stamp Set (English) [ 165383 ]](https://assets1.tamsnetwork.com/images/EC042017NF/165383s.jpg)
![2025–2027 In Color™ Flat Pearls [ 165192 ] 2025–2027 In Color™ Flat Pearls [ 165192 ]](https://assets1.tamsnetwork.com/images/EC042017NF/165192s.jpg)
![Strawberry Slush Classic Stampin' Pad [ 165286 ] Strawberry Slush Classic Stampin' Pad [ 165286 ]](https://assets1.tamsnetwork.com/images/EC042017NF/165286s.jpg)
![Strawberry Slush Classic Stampin' Ink Refill [ 165282 ] Strawberry Slush Classic Stampin' Ink Refill [ 165282 ]](https://assets1.tamsnetwork.com/images/EC042017NF/165282s.jpg)
![Darling Duckling Classic Stampin' Pad [ 165277 ] Darling Duckling Classic Stampin' Pad [ 165277 ]](https://assets1.tamsnetwork.com/images/EC042017NF/165277s.jpg)
![Darling Duckling Classic Stampin' Ink Refill [ 165280 ] Darling Duckling Classic Stampin' Ink Refill [ 165280 ]](https://assets1.tamsnetwork.com/images/EC042017NF/165280s.jpg)
![Timid Tiger Classic Stampin' Pad [ 165278 ] Timid Tiger Classic Stampin' Pad [ 165278 ]](https://assets1.tamsnetwork.com/images/EC042017NF/165278s.jpg)
![Timid Tiger Classic Stampin' Ink Refill [ 165283 ] Timid Tiger Classic Stampin' Ink Refill [ 165283 ]](https://assets1.tamsnetwork.com/images/EC042017NF/165283s.jpg)
![Secret Sea Classic Stampin' Pad [ 165285 ] Secret Sea Classic Stampin' Pad [ 165285 ]](https://assets1.tamsnetwork.com/images/EC042017NF/165285s.jpg)
![Secret Sea Classic Stampin' Ink Refill [ 165281 ] Secret Sea Classic Stampin' Ink Refill [ 165281 ]](https://assets1.tamsnetwork.com/images/EC042017NF/165281s.jpg)
![Stampin' Dimensionals [ 104430 ] Stampin' Dimensionals [ 104430 ]](https://assets1.tamsnetwork.com/images/EC042017NF/104430s.jpg)
![Take Your Pick [ 144107 ] Take Your Pick [ 144107 ]](https://assets1.tamsnetwork.com/images/EC042017NF/144107s.jpg)
![Bone Folder [ 102300 ] Bone Folder [ 102300 ]](https://assets1.tamsnetwork.com/images/EC042017NF/102300s.jpg)
![Paper Trimmer [ 152392 ] Paper Trimmer [ 152392 ]](https://assets1.tamsnetwork.com/images/EC042017NF/152392s.jpg)
Leave A Comment