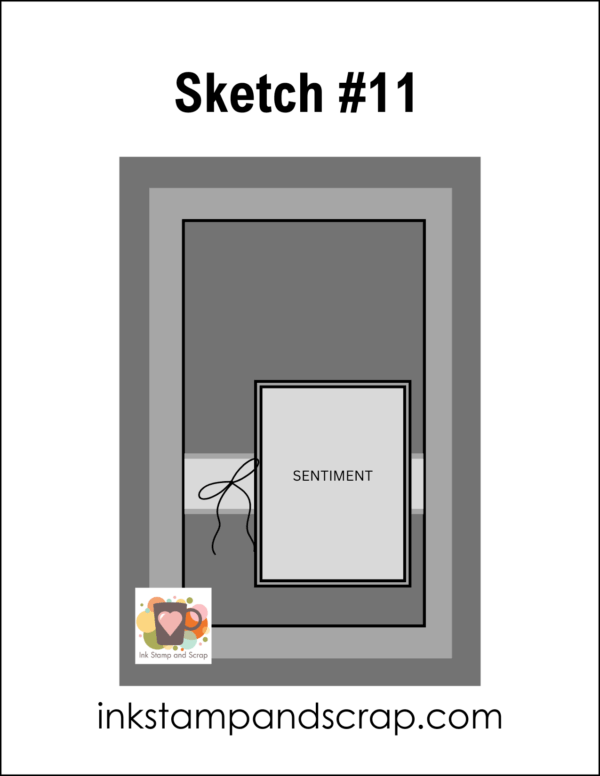
The Last Chance products have been updated! These will only be available while supplies last and some have been deeply discounted. I created today's card for you before this list was updated. The greeting in this card is from the Pattern of Friendship stamp set which is on the Last Chance list. This card is based on the sketch from our Sketch Masterclass published a few weeks ago. You can see the sketch below and scroll down for an explanation of the ways I applied the sketch to this card design.
Did you know that I have a Digital Download Store now? Check it out and grab both free and paid items!
SPECIAL NOTE: The Paper Snips used to make the banner shape for the greeting are no longer carried by Stampin' Up! I will by using the term sharp scissors going forward and I try to find a good replacement item for you to enjoy.
The Card
Here's the card we're making today. You can see that I expanded the focus layer that usually had the greeting. I moved the decorative strip to the top of the card to create a space for a long horizontal greeting. If you have long horizontal greetings in your crafty collection you might want to consider keeping this sketch in mind.

The Supplies
Here's the list of supplies used for this card. You can click on any individual picture to view the product. If you click add to cart all the items will be added to your Stampin' Up! Cart. This is the easiest way to see which items are on Last Chance. If you want a full accounting of the Last Chance Items you can view them using this page or directly by clicking here.
")
![So Swirly Embossing Folder [ 163791 ]](https://assets1.tamsnetwork.com/images/EC042017NF/163791s.jpg "So Swirly Embossing Folder [ 163791 ]")


![Rainbow Adhesive Backed Dots [ 162758 ]](https://assets1.tamsnetwork.com/images/EC042017NF/162758s.jpg "Rainbow Adhesive Backed Dots [ 162758 ]")
![Paper Snips [ 103579 ]](https://assets1.tamsnetwork.com/images/EC042017NF/103579s.jpg "Paper Snips [ 103579 ]")


Measurements
Here are the measurements used to make this card. Remember to mix them up to suit your supplies:)
- Basic White – 8 1/2″ x 5 1/2″ score at 4 1/4″
- Strawberry Slush – 5 1/4″ x 4″
- Coastal Cabana – 5 1/8″ x 2 5/8″
- Floral Blooms DSP Strip – 5″ x 2 1/2″
- Basic White – 4″ x 3/4″ for greeting banner
Let's Make It
To put this card together – follow these steps:
- Stamp the greeting in the center of the Basic White scrap strip in Strawberry Slush ink
- Cut the left side with your Paper Snips to make a banner
- Run the Strawberry Slush through your die embossing machine using the So Swirly folder
- Glue the embossed layer to the card base
- Glue the floral paper to the Coastal Cabana layer and then to the card base on the right side
- Add the banner using glue only on the portion touching the floral paper
- Add a few Rainbow Dots for a pop of color
I hope you are enjoying these posts about twisting and turning sketches to create unique cards. Let me know in the comments if you'd like to see me continue these types of posts.

Pin This
If you want to make sure you have an easy to find copy – be sure to save this to your Ink Stamp and Scrap Pinterest board. Let me know if you like this new picture with a pin for you to save.

Thanks for Stopping By
Thanks for stopping by today! Watch for a bundle of Halloween cards coming your way for the rest of August and into September.
xo,
Linda
Leave A Comment