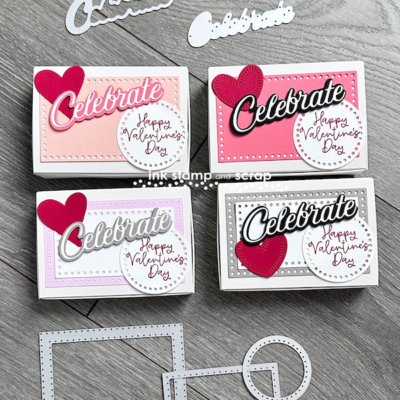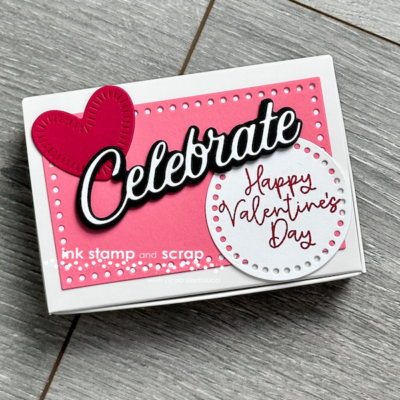
Happy Valentine's Day! Today's project is an Easy Way to Deliver a Gift Card that you can use today or anytime! They key to this project is the Stampin' Up! Scalloped Gift Card Box that basically does all the work for you. You can pair this with any stamps, dies, card stock and paper to make someone's day. You can also use these for any occasion and they mail really easy too!
All these projects are very similar. I just wanted to send each person one that was a little unique. Below I will describe exactly how I made one of the boxes. Leave a comment below if you'd like to know more or you'd like me to create a post with a do-it-yourself gift card holder box.

CUT YOUR CARDSTOCK
- Flirty Flamingo: 4 1/4″ by 5 1/2″
- Basic White: 4 1/4″ by 5 1/2″
- Basic Black: 2″ by 5 1/2″
- Real Red – 2″ by 2″
PROJECT TUTORIAL
Die Cut Card Stock
- Flirty Flamingo – Crop with largest rectangle from Everyday Detail Dies
- Basic White –
-
- Crop with largest circle from Everyday Detail Dies
- Add Adhesive sheet to remaining portion and crop with “Celebrate” from Wanted to Say dies
- Basic Black – crop with background for “Celebrate” from Wanted to Say dies
- Real Red – crop with heart from Radiating Stitched Dies
Create Gift Card Holder
- Fold along all the score lines of the Scalloped Gift Card Holder Box
- Use the Bone Folder to burnish the creases for easy assembly
- Fold the four small flaps to the inside of the box
- Fold the two sides and front over and secure in slots pre-cut in box
- Fold top over and tuck inside
Pro Tip: Use the repositional feature of the Multipurpose glue to secure the flap with the scallops showing. Be sure to let the glue dry to a tacky finish before you seal the box.
Add the Finishing Touches
- Attach the Celebrate layers together by removing the release paper from the Basic White word and attaching to the Basic Black
- Attach the Flirty Flamingo rectangle to the box with Multipurpose Glue
- Attach the Celebrate using Stampin' Dimensionals
- Attach the heart using Multipurpose Glue
- Attach the circle with the greeting with Multipurpose Glue
Stampin' Up! Supplies
Click on a picture to shop at My Store
Thank you for stopping by today, please be sure to . . .
- Receive a FREE PDF tutorial when you subscribe to my emails here.
- Earn up to a $50 shopping spree with my Ink Stamp and Scrap Rewards Program.
- Check out the clearance rack and save up to 70%.
- Save 10% on coordinating product bundles!
- The $99 Starter Kit is the best deal of ALL! Discounts & benefits here
- Visit my gallery for paper crafting ideas.
- Follow me on Pinterest.
- Follow me on Instagram.
- Subscribe to my YouTube paper crafting video tutorials.


Leave A Comment