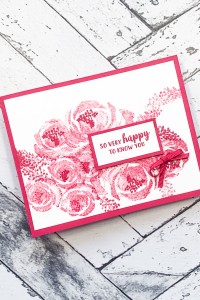
Today I'm sharing how to make a quick and easy card with one color. In the old days using only one color could look a little boring; but with the invention of photo-realistic stamps that have depth and gradation to them you can make a card that looks like you used three or four shades of ink instead of just one.
Today I'm sharing how to make a quick and easy card with just one color. In the old days using only one color could look a little boring; but with the invention of photo-realistic stamps that have depth and gradation to them you can make a card that looks like you used three or four shades of ink instead of just one.
If you've been following me for awhile you know that we are living in Florida now, but waiting for our forever home to finish next month. About 70% of my crafty stash is in storage in Connecticut. That was never the plan – we thought we would be in a home by December. Anyway, one way to conserve my products is to only use one color on a project. And that, my friends, is where I came up with this card.
The Beautiful Friendships stamp set give you those photo-realistic stamps and then I did a little shading of my own using second and third generation stamping. Not sure what those terms mean? Hop over to my Facebook Page where we are discussing lots of stamping terms, color preferences and having a good ol' time!
But before you go anywhere – check out how to make this quick and easy card using one color:
DIMENSIONS
- Lovely Lipstick – 11″ by 4 1/4″ ; score and fold at 5 1/2″ and 1″ by 2″
- Whisper White – 5 1/4″ by 4″ and 3/4″ by 1 3/4″
INSTRUCTIONS
- Stamp the three flower bundle just above the midpoint of the Whisper White layer – use the second generation of the imge
- Stamp the three flower again in the opposite direction below the first image – be sure to use the second generation again
- Add some single roses – second generation – to fill in the gaps between the two flower bunches
- Attach the Whisper White layer to the card base
- Stamp the fill around the flowers in both first and second generation
- Stamp the greeting on the small Whisper White layer
- Mat the greeting and attach to the card using Stampin' Dimensionals
- Tie a bow with the 10 Second Bow Maker and attach to the card with a Mini Glue Dot
Stampin' Up! Supplies
Click on a picture to shop at My Store
Pin for Later
Pin this graphic below to your Ink Stamp and Scrap with Linda board on Pinterest so you can easily find this project again.

Thank you for stopping by today, please be sure to . . .
- Receive a FREE PDF tutorial when you subscribe to my emails here.
- Earn up to a $50 shopping spree with my Ink Stamp and Scrap Rewards Program.
- Check out the clearance rack and save up to 70%.
- Save 10% on coordinating product bundles!
- The $99 Starter Kit is the best deal of ALL! Discounts & benefits here
- Visit my gallery for paper crafting ideas.
- Follow me on Pinterest.
- Follow me on Instagram.
- Subscribe to my YouTube paper crafting video tutorials.


Leave A Comment