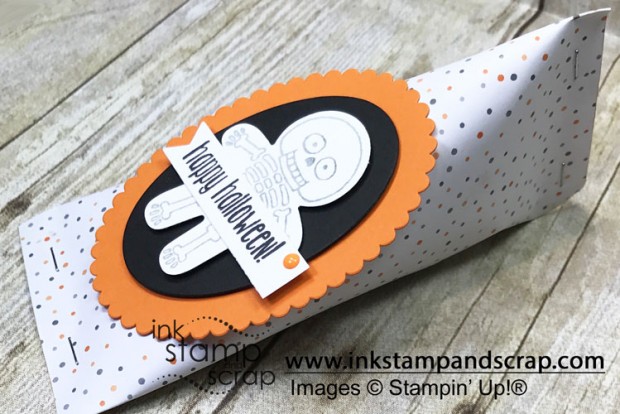
Making bunches of Halloween DIY sour cream containers went super fast! I'm very excited to send these to Tuscaloosa for Halloween. They've been stuffed with candy and wrapped up so they can easily be delivered to my kids friends'. 
Why is this called a “sour cream container”? This packaging was designed after the single serve sour cream containers that were popular before squirt bottles became cheap enough to buy for buffet-style serving. Here is a picture of one they have used at Disney properties:
All you need to begin making these Halloween DIY sour cream containers is a square of designer series paper or card stock. Then follow this simple diagram:
The thick black lines represent your permanent adhesive that will keep the container together. The shading is just to give you guidelines as to where to place the adhesive. When making these with designer series paper, even candy bars are heavy. That is why after these were completely assembled, filled and closed I stapled each end.
You can assemble bunches of these in record time if you follow these 10 simple steps:
- Cut paper squares (6″ square holds 3 Halloween size candy bars)
- Attach Tear and Tape to all the squares
- Cut decoration pieces
- Assemble decoration (in this case the skeleton on the ovals)
- Partially assemble the container by creating the “tube”
- Close one end
- Fill the containers
- Close the containers by sealing the other end
- Staple containers if you plan to ship them
- Attach the decoration to the container
To create the banner with the “happy halloween” greeting I ran some Whisper White card stock through the big shot with the double sided framelit from Bunches of Banners. You can just as easily punch the end with the corner of a square punch or hand snip the flag end. Here is a quick three steps for creating the flag by hand:
- Snip up the center as to the depth of the banner end
- Cut at a diagonal from the corner to the top of the cut in step one
- Snip the other diagonal from the opposite corner to the top of the cut in step one
Halloween DIY Sour Cream Containers
|
|
|||
|
|
|
|
|
|
|
|
|
|
Thanks for stopping by. See you tomorrow! Linda
Let me know if you decide to make your own Halloween DIY sour cream containers!


Leave A Comment