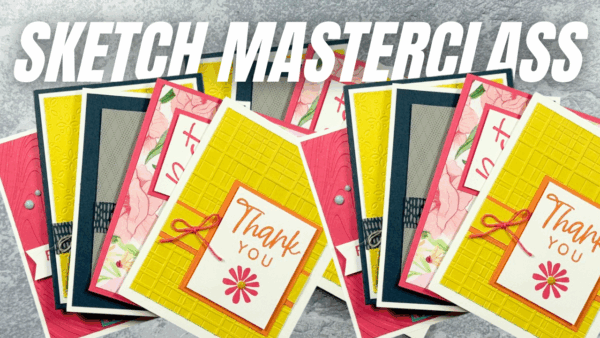
Today's post shared details from my new video: Create Multiple Unique Cards from One Sketch.
In this blog post, I'm thrilled to share the beautiful cards created from this one sketch. I called this video a masterclass because you'll not only see how to take a sketch and create a card, but also use the sketch as inspiration for other cards by changing the materials you use, shapes of the layers and more.
Coming Up
You'll find future posts with supply lists and measurements for Project 3 – 5 shown below. Each time I make those posts I will link back to this post and also update it with the direct link to the details of the card.
Let me know in the comments if you enjoyed this type of post and video. I had a great time making it and would like to use this format to share more sketch variations and fun fold cards.
If you're having trouble watching the video here, click this link to watch it directly on YouTube.
Use the Sketch
In the first card of the video I share making a card directly from the sketch. This card is from a blog post in July and you can view all the details, including supplies and dimensions in this post.
You'll also find lots of tip for mass producing cards in this post – be sure to check it out!

Make a Card
Next up in the video we made a card together. For this card we changed the card base to a hamburger cut and used designer series paper for the background layer.


Supplies
![With You In Mind Photopolymer Stamp Set (English) [ 164747 ]](https://assets1.tamsnetwork.com/images/EC042017NF/164747s.jpg "With You In Mind Photopolymer Stamp Set (English) [ 164747 ]")
![Pack Your Bags Twine Three Pack [ 165582 ]](https://assets1.tamsnetwork.com/images/EC042017NF/165582s.jpg "Pack Your Bags Twine Three Pack [ 165582 ]")


![Strawberry Slush Classic Stampin' Pad [ 165286 ]](https://assets1.tamsnetwork.com/images/EC042017NF/165286s.jpg "Strawberry Slush Classic Stampin' Pad [ 165286 ]")
![Strawberry Slush Classic Stampin' Ink Refill [ 165282 ]](https://assets1.tamsnetwork.com/images/EC042017NF/165282s.jpg "Strawberry Slush Classic Stampin' Ink Refill [ 165282 ]")
![Petunia Pop Classic Stampin Pad [ 163811 ]](https://assets1.tamsnetwork.com/images/EC042017NF/163811s.jpg "Petunia Pop Classic Stampin Pad [ 163811 ]")
![Petunia Pop Classic Stampin’ Ink Refill [ 163820 ]](https://assets1.tamsnetwork.com/images/EC042017NF/163820s.jpg "Petunia Pop Classic Stampin’ Ink Refill [ 163820 ]")


![Multipurpose Liquid Glue [ 110755 ]](https://assets1.tamsnetwork.com/images/EC042017NF/110755s.jpg "Multipurpose Liquid Glue [ 110755 ]")
![Silicone Craft Sheet [ 127853 ]](https://assets1.tamsnetwork.com/images/EC042017NF/127853s.jpg "Silicone Craft Sheet [ 127853 ]")
![Stampin' Seal [ 152813 ]](https://assets1.tamsnetwork.com/images/EC042017NF/152813s.jpg "Stampin' Seal [ 152813 ]")
Measurements
- Strawberry Slush – 8 1/2″ x 5 1/2″; score at 4 1/2″ and 3 1/4″ x 2 1/4″
- Basic White – 5 1/4″ x 4″ (inside) and 3″ x 2″
- Petunia Pop – 5 1/4″ x 3/4″
- Peach Pie – 5 1/4″ x 1″
- Floral Blooms Paper – 5 1/4″ x 4″ and 4″ x 1″ (inside)
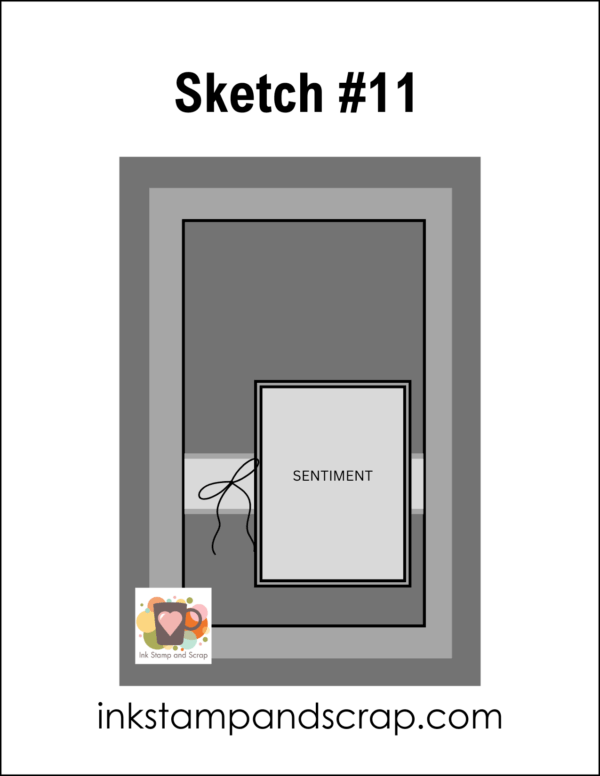
Here is a picture of the sketch used in this video. If you want to view it as a printable file click here.
Put It Together
If you're having trouble watching the video here, click this link to watch it directly on YouTube.
Project 3
In this project we start to play with the sketch to make different cards. This time we eliminate one of the narrow strips and change the greeting shapes to circles.

Project 4
For this card we changed the sizes of the layers and skipped the mat for the greeting. We also moved the greeting over because it was larger than usual.

Project 5
For the final card in this Sketch Masterclass we used more of the Floral Blooms papers, but really changed up the layers of the card. The main focus is now the greeting on the thin strip, but it's the top layer of the card. The matted layer of the card extends over more than half of the usual large layer.

Stay Tuned for More
Did you enjoy this Sketch Masterclass? I’d love to hear your thoughts in the comments! Let me know if you'd like to see more posts and videos like this featuring card sketches, fun fold designs, or mass-production cardmaking tips.
Thanks for stopping by, and don’t forget to subscribe to the video channel for more tutorials.
Leave A Comment